
Quick View App Installation
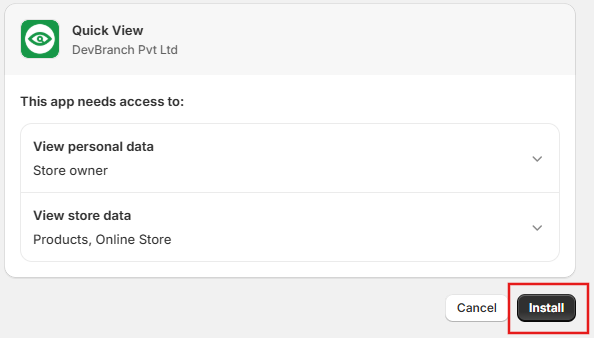
Once you click the install button in our DB Quick View app page in the app store, you will be redirected to get the permission prior to installation. If you agree to give the permission, you can click on the install button.
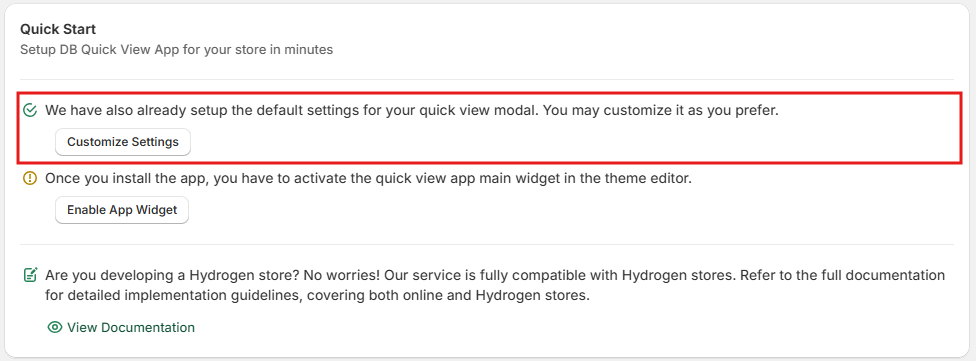
Setup Guide
Online Store
When you are done installing, you will be redirected to the main page. If you are maintaining There we have provided a quick guide to set up the app for ready to use in a quick manner. Once you follow these steps, you can have the app featured without any hesitation.
STEP 1
We have provided default settings for you. However, you can edit in the settings page as you prefer.
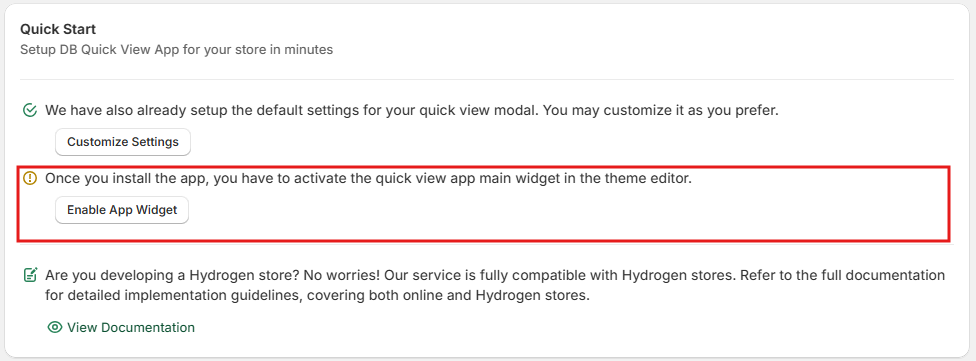
STEP 2
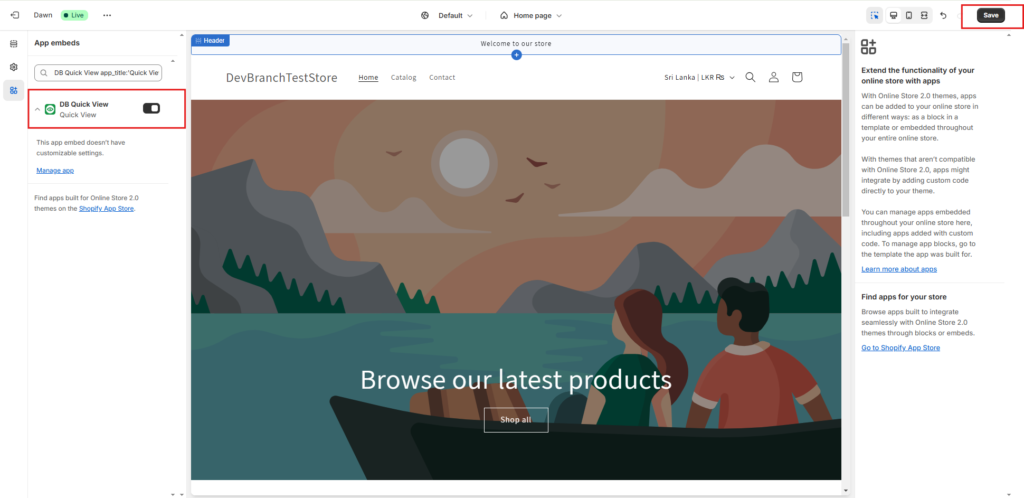
You have to enable the app main widget embedded block in the theme editor. You will be directed to the theme editor by clicking on the button.
Hydrogen Store
Our app supports Hydrogen stores as well. Setting up is a bit different than for online stores. We have provided you the UI react component for you via NPM. The implementation is as follows.
STEP 1
First install the app from the app store.

STEP 2 – Install the npm Package
Since the Hydrogen projects are based on react in Hydrogen framework, we have created an app UI component which has to be installed via NPM to the Hydrogen project base.
npm i db-quickview-hydrogenSTEP 3 – Adding Quick View Button
Step 1: Enable Quick View Button on the Index Page
- Import the Quick View Button Component – importing the Quick view button component into your Index Page file.
import QuickViewButton from '~/components/QuickViewButton'; 2. Loader Function to Fetch API Data – Fetch Quick View settings data via an external API (proxy data) to Determine Quick View Settings
export async function loader({context}) {

  const deferredData = loadDeferredData({context});
  const criticalData = await loadCriticalData({context});

  const shopName = "shopifyStoreName.myshopify.com";
  const response = await fetch(`https://hopkins-workshops-patch-defined.trycloudflare.com/app/hydrogen?shop=${shopName}`);

  const proxyData = await response.json();

  return defer({...deferredData, ...criticalData, proxyData });
}
3. Change RECOMMENDED_PRODUCTS_QUERY – Adding Variants to Product Query for More Options
const RECOMMENDED_PRODUCTS_QUERY = `#graphql
  fragment RecommendedProduct on Product {
    id
    title
    handle
    description
    descriptionHtml
    priceRange {
      minVariantPrice {
        amount
        currencyCode
      }
    }
    images(first: 1) {
      nodes {
        id
        url
        altText
        width
        height
      }
    }
       variants(first: 20) {
            edges {
              node {
                id
                title
                image {
                  originalSrc
                  altText
                }
              }
            }
          }
  }
  query RecommendedProducts ($country: CountryCode, $language: LanguageCode)
    @inContext(country: $country, language: $language) {
    products(first: 4, sortKey: UPDATED_AT, reverse: true) {
      nodes {
        ...RecommendedProduct
      }
    }
  }
`;
4. Add the Button to Each Product – For each recommended product, add the Quick View Button under the product details by checking if the Quick View feature is enabled . When clicked, it will open a modal displaying the product details.
function RecommendedProducts({products, customData}) {
  const [selectedProduct, setSelectedProduct] = useState(null); // State to hold product data
  const [showQuickView, setShowQuickView] = useState(false); // State to control QuickView visibility

  async function handleQuickView(product) {
      setSelectedProduct(product); // Store the fetched product data
      setShowQuickView(true); // Show the QuickView component
  }


  function handleClose() {
    setShowQuickView(false); // Hide the QuickView component
    setSelectedProduct(null); // Clear the selected product data
  }


  return (
    <div className="recommended-products">
    <h2>Recommended Products</h2>
    <Suspense fallback={<div>Loading...</div>}>
      <Await resolve={products}>
        {(response) => (
          <div className="recommended-products-grid">
            {response
              ? response.products.nodes.map((product) => (
                  <div key={product.id} className="recommended-product-wrapper">
                    <Link
                      className="recommended-product"
                      to={`/products/${product.handle}`}
                    >

                      <Image
                        data={product.images.nodes[0]}
                        aspectRatio="1/1"
                        sizes="(min-width: 45em) 20vw, 50vw"
                      />
                      <h4>{product.title}</h4>
                      <small>
                        <Money data={product.priceRange.minVariantPrice} />
                      </small>
                    </Link>

                    {customData.previousGeneralSettings.quickViewEnabled && (
                      <QuickViewButton
                        product={product}
                        customData={customData}
                        handleQuickView={handleQuickView}
                      />
                    )}

                  </div>
                ))
              : null}
          </div>
        )}
      </Await>
    </Suspense>

    {showQuickView && (
        <QuickView productData={selectedProduct} onClose={handleClose} customData={customData}/>
      )}

  </div>
  );
}
Step 2: Enable Quick View Button on the Collection Page
- Import the Quick View Button Component – importing the Quick view button component into your Collection Page file.
import QuickViewButton from '~/components/QuickViewButton'; 2. Loader Function to Fetch Data – Fetch Quick View settings data via an external AP to Determine Quick View Settings
export async function loader({context}) {

  const deferredData = loadDeferredData({context});
  const criticalData = await loadCriticalData({context});

  const shopName = "shopifyStoreName.myshopify.com";
  const response = await fetch(`https://hopkins-workshops-patch-defined.trycloudflare.com/app/hydrogen?shop=${shopName}`);

  const proxyData = await response.json();

  return defer({...deferredData, ...criticalData, proxyData });
}
3. Change PRODUCT_ITEM_FRAGMENT – Adding Variants to Product Query for More Options
const PRODUCT_ITEM_FRAGMENT = `#graphql
  fragment MoneyProductItem on MoneyV2 {
    amount
    currencyCode
  }
  fragment ProductItem on Product {
    id
    handle
    title
    description
    featuredImage {
      id
      altText
      url
      width
      height
    }
    priceRange {
      minVariantPrice {
        ...MoneyProductItem
      }
      maxVariantPrice {
        ...MoneyProductItem
      }
    }
    variants(first: 20) {
      edges {
        node {
          id
          title
          selectedOptions {
            name
            value
          }
          image {
            originalSrc
            altText
          }
        }
      }
    }
  }
`;
4. Add the Button to Each Product – First of all , Add the Quick View Button component for each product inside the PaginatedResourceSection which is used to display the products in the collection. and then For each product , add the Quick View Button under the product details by checking if the Quick View feature is enabled
export default function Collection() {
  const { collection, proxyData } = useLoaderData();
  const customData = proxyData;
  const [selectedProduct, setSelectedProduct] = useState(null);
  const [showQuickView, setShowQuickView] = useState(false);

  async function handleQuickView(product) {
      setSelectedProduct(product);
      setShowQuickView(true);
  }

  function handleClose() {
    setShowQuickView(false);
    setSelectedProduct(null);
  }

  return (
    <div className="collection">
      <h1>{collection.title}</h1>
      <p className="collection-description">{collection.description}</p>
      <PaginatedResourceSection
        connection={collection.products}
        resourcesClassName="products-grid"
      >
        {({ node: product, index }) => (
          <ProductItem
            key={product.id}
            product={product}
            loading={index < 8 ? 'eager' : undefined}
            onQuickView={handleQuickView}
            customData={customData}
          />
        )}
      </PaginatedResourceSection>
      <Analytics.CollectionView
        data={{
          collection: {
            id: collection.id,
            handle: collection.handle,
          },
        }}
      />
      {showQuickView && (
        <QuickView productData={selectedProduct} customData={customData} onClose={handleClose} />
      )}
    </div>
  );
}

/**
 * @param {{
 *   product: ProductItemFragment;
 *   loading?: 'eager' | 'lazy';
 * }}
 */
function ProductItem({product, loading,onQuickView, customData}) {
  const variant = product.variants.edges[0]?.node;
  const variantUrl = useVariantUrl(product.handle, variant.selectedOptions);
  return (
    <div className="recommended-product-wrapper">
    <Link
      className="product-item"
      key={product.id}
      prefetch="intent"
      to={variantUrl}
    >
      {product.featuredImage && (
        <Image
          alt={product.featuredImage.altText || product.title}
          aspectRatio="1/1"
          data={product.featuredImage}
          loading={loading}
          sizes="(min-width: 45em) 400px, 100vw"
        />
      )}
      <h4>{product.title}</h4>
      <small>
        <Money data={product.priceRange.minVariantPrice} />
      </small>
    </Link>
        {customData.previousGeneralSettings.quickViewEnabled && (
          <QuickViewButton
          product={product}
          customData={customData}
          handleQuickView={onQuickView}
        />
        )}


    </div>

  );
STEP 4
You may have to allow the link of our base app under content security policy – https://db-wishlist-app-2426a7cce9e6.herokuapp.com/